Highly Accurate Gantry Plays Critical Role in Non-Contact Ultrasound Testing

Time to Read: 4m 0s

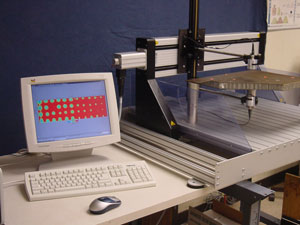
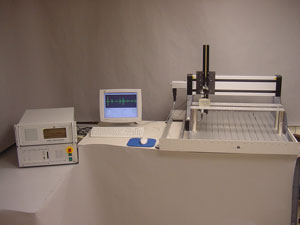
Photos 1 and 2 show the AirTech 4000 non-contact ultrasound inspection system, which uses the Techno gantry.

Ultrasound is widely used in health care for non-invasive diagnostics and in industry for non-destructive testing. By propagating an ultrasound wave in a given medium, useful information about medium can be generated by measuring the reflected or transmitted signals. Ultrasound differs from other wave-based methods because it does not require sample preparation, is non-hazardous, and provides the means to determine defects, mechanical properties, microstructure, imaging and microscopy. Ultrasound is also applicable to all states of matter with the exception of plasma and vacuum. Ultrasound applications include the characterization of elastic and mechanical properties; delaminations in multilayered, particulate and fibrous materials; proximity and dimensional analysis; measurements of anisotropy and heterogeneity; surface profiling, chemical corrosion, crystallization and polymerization; liquid and gas flow metering; imaging of surface and internal features of materials; viscosity of liquids; texture and microstructure of granular and cellular materials; applied and residual stresses; high temperature, pressure and radiation environment applications; and so on.
Challenge of non-contact ultrasound
Due to extremely high acoustic impedance mismatch between a non-contacting medium, such as air, and the test media, ultrasound waves can be attenuated by as much as six orders of magnitude when propagated from air to many common materials. As a result, a major limitation of this technology has been the need to physically couple the transducer to the test medium. Conventional wisdom dictates that ultrasound cannot be propagated through solids or liquids without physical contact between the transducer and the test medium. This has limited the application of this technology to materials that are not damaged by contact with the transducer and a liquid gel used to couple the transducer to the test medium. So it is normally impossible to test materials that are in the early stages of formation, such as uncured plastics, green ceramics, and powered metals; materials that are continuously rolled on a production line or have a large surface area to be scanned. For these reasons, non-contact ultrasound methods that would greatly increase the applicability of this testing method have long been sought.A key to overcoming this limitation has been the recent development of piezoelectric transducers that have a very high level of sensitivity. For example, one comparison of these new transducers in air and conventional contact sensors in water shows that the sensitivity of the former is only between 12 dB to 40 dB less than the latter in a frequency range of 50 kHz to 5 MHz. The ultrasound transduction efficiency of new transducers is sufficient to break the massive acoustic impedance mismatch barrier between air and most materials.
Overcoming the challenge
SecondWave Systems has now successfully integrated the non-contact ultrasonic transducers with the new generation of ultrasonic instruments and mechanical transducer translational systems. The two newest systems are the AirTech 4000 which uses the Techno Gantry, and the iPass which works statically or in a scanning configuration. The analyzer is normally operated in direct transmission mode in order to characterize a sample for thickness, velocity, density, defects, and microstructure. When the material surface needs to be evaluated, it can be operated in direct reflection mode because reflectivity of ultrasound is directly related to surface roughness. For example, when ultrasound encounters a discontinuity in its path of propagation, the amount of energy transmitted is reduced, relative to that from a defect-free region.One of the significant functions of the iPass System is that one can monitor the trend of any measured parameter (thickness, velocity, time-of-flight, attenuation, and density) as a function of its variation from one point to another. This feature is particularly beneficial for linear imaging or for on-line applications where the product is in motion. The system provides two trend plots, thus facilitating two independent measurements of a material, or from two different locations on it. The speed of a trend plot can be synchronized with that of the moving object or the material.
Non-contact ultrasound measuring technology has been successfully applied for the analysis of wide range of materials. This includes, aircraft/aerospace composites, space shuttle thermal protection tiles; green ceramics and powder metals; light metals; porous materials and foams; rubbers, tires, and plastics; wood, lumber, and construction materials; asphalt and re-enforced concretes; food and pharmaceutical products, level sensing and proximity analysis; bone density (osteoporosis) measurements, and several other materials and applications. Non-contact ultrasonic transmission and reflection signals are monitored in real time and are related to significant material characteristics, such as defects, texture, density, porosity, etc.
Need for accurate motion control
About a year ago, through conversations with customers, Neeraj Bhardwaj, Director of Sales and Marketing for SecondWave Systems, identified the need for a non-contact ultrasound device capable of accurately measuring and inspecting large surface areas. "To bring the new product to market, we needed a motion control system with a high level of accuracy to move the transducer over the test materials while accurately recording its position,” Bhardwaj said. “Cost was also a major consideration because the manufacturing market is very price-sensitive.” Bhardwaj discovered the Techno-Isel stepper motor controlled gantry system that at a very reasonable price delivers 0.0005-inch resolution and repeatability and 0.003 inches/foot absolute accuracy. Techno offers travel ranging from 8 by 10 by 5 inches up to 56 by 96 by 20 inches. This mechanical system delivers durable, play-free motion that is rigid and stable.This stepper motor controlled gantry system is constructed on steel stress-relieved bases with hardened steel linear ways. Its shaft-and-bearing system produces very smooth, play-free motion and is an extremely rigid system that produces high-accuracy positioning. The gantry's design includes heavy cast aluminum side plates supporting the y-axis, giving extra stiffness for accuracy in positioning. Anti-backlash ball screws and nuts are standard. These screws have excellent power transmission due to the rolling ball contract between the nut and screws and also feature extremely small backlash. Rolling ball contract between the nut and screw provides excellent rigidity and ensures long life because wear is considerably lower than ACME screws and nuts which have sliding friction contact.
SecondWave Systems interfaced the Airtech 4000 with the Techno-Isel Gantry system to create a system capable of generating ultrasonic images in the familiar c-scan mode. The Airtech 4000 is a general purpose 2-axis linear motion control platform. It provides a scanning area 50 x 54 cm. The drive mechanism consists of 16 mm ball screws and 4 mm double re-circulating ball bearings. The analyzer also includes 15 cm posts, two precision transducer alignment holders, a serial interface cable, MATLAB ready scripts for data presentation and a power cord.
“The Gantry has been a tremendous success,” Bhardwaj said. “The gantry rapidly moves over the test materials while the transducer fires off signals that evaluate parameters of interest at every point in the test item. Our customer obtains a comprehensive record of the material properties. The cost is very reasonable. The accuracy and reliability of the Techno-Isel has exceeded our expectations. Customers in the ceramics, paper, composites, and other industries are using it for automated, nondestructive testing that couldn’t be performed in any other way. Non-contact ultrasound is clearly the wave of the future for a wide range of inspection applications.”
For more information contact: Techno, Inc. Linear Motion Systems, 2101 Jericho Turnpike, New Hyde Park, NY 11040. Phone: 516-328-3970 Fax: 516-358-2576 E-mail: TECHNO LINEAR MOTION SYSTEMS.


